diy vs pro
How to Refinish Hardwood Floors Like the Pros
How to refinish hardwood floors the way pros do – the equipment, sanding sequence, chemistry, and details that DIY rental kits leave out.
Are your floors looking tired, worn, and dull? Don’t worry, because in this article, we are going to show you how to refinish wood floors like a pro! With our expert tips and techniques, you can transform your wood floors from drab to fab in no time.
Refinishing your wood floors not only restores their beauty, but it also adds value to your home. Whether you have hardwood, laminate, or vinyl floors, our step-by-step guide will walk you through the process and help you achieve professional-level results.
Say goodbye to expensive professional services and hello to DIY satisfaction. Our easy-to-follow instructions will save you time and money, allowing you to take pride in your own craftsmanship. From preparing the floors to applying the final coat of finish, we will cover every aspect of the refinishing process.
So, why settle for dull and worn floors when you can have stunning, like-new ones? Get ready to roll up your sleeves and get to work. With our guidance, you’ll soon be enjoying floors that are not only beautiful but also built to last. Get started on your refinishing journey now!
Types of Flooring Suitable for Refinishing
Not all types of flooring can be refinished, so it’s important to know which ones are suitable. Here are some common types of flooring that can be successfully refinished:
1. Hardwood Floors: Hardwood floors are the most popular choice for refinishing. Whether you have solid hardwood or engineered hardwood floors, they can be sanded down and refinished multiple times, allowing you to maintain their beauty for decades. 2. Laminate Floors: Laminate floors are a budget-friendly option that can be refinished. While laminate floors cannot be sanded down like hardwood, they can be deep cleaned and have a new protective layer applied, which can help restore their appearance. 3. Vinyl Floors: Vinyl floors are another type of flooring that can be refinished. However, the process for refinishing vinyl floors differs from hardwood or laminate. It involves cleaning, repairing any damages, and applying a specialized vinyl floor finish to protect and enhance the appearance.
Before attempting to refinish your wood floors, it’s important to identify the type of flooring you have and research the specific refinishing techniques and products suitable for that material. This will ensure that you achieve the best results and avoid any potential damage to your floors.
Tools and Materials Needed for Floor Refinishing
To refinish your wood floors like a pro, you’ll need the right tools and materials. Here’s a list of essential items you’ll need for the refinishing process:
1. Floor Sander: A floor sander is a crucial tool for removing the old finish and smoothing out the surface of your floors. There are different types of floor sanders available, such as drum sanders and orbital sanders, so choose the one that suits your needs and flooring type. 2. Sandpaper: Depending on the condition of your floors, you’ll need different grits of sandpaper. Coarse grits are used for initial sanding to remove the old finish and imperfections, while finer grits are used for final sanding to achieve a smooth and even surface. 3. Vacuum Cleaner: A vacuum cleaner with a brush attachment is essential for removing dust and debris during the sanding process. Regularly vacuuming the floor will ensure a clean and smooth surface for refinishing. 4. Stain or Finish: Depending on your preference and the type of flooring, you’ll need to choose a suitable stain or finish. There are various options available, such as oil-based finishes, water-based finishes, and stains in different shades. Consider factors like durability, drying time, and VOC content when selecting a product. 5. Paintbrushes and Rollers: Paintbrushes and rollers are used for applying the stain or finish to your floors. Choose high-quality brushes and rollers that are suitable for the type of product you’re using to ensure a smooth and even application. 6. Safety Gear: Don’t forget to prioritize your safety during the refinishing process. Wear safety goggles, a dust mask, and gloves to protect yourself from dust, fumes, and chemical exposure.
Having these tools and materials ready before you start refinishing your floors will ensure a smooth and efficient process. Remember to follow the manufacturer’s instructions for any products you use and take all necessary safety precautions.
Step-by-Step Guide to Floor Refinishing
Now that you have all the necessary tools and materials, it’s time to dive into the step-by-step process of refinishing your wood floors. Follow these instructions carefully to achieve professional-level results:
Step 1: Prepare the Room
Before you start refinishing, clear the room of all furniture, rugs, and other items. This will give you a clean and open space to work with. Cover any vents and electrical outlets with plastic to protect them from dust.
Step 2: Prepare the Floors
Thoroughly clean the floors with a broom and vacuum to remove any dust, dirt, and debris. Use a wood cleaner or mild detergent to remove any stubborn stains or residue. Once the floors are clean, allow them to dry completely.
Step 3: Sanding
Start the sanding process by using a coarse-grit sandpaper on the floor sander. Begin in one corner of the room and work your way across the floor, moving in the direction of the wood grain. Sand the entire floor, including edges and corners, ensuring a consistent and even finish. Repeat the sanding process with progressively finer grits of sandpaper until you achieve a smooth and blemish-free surface. Vacuum the floor thoroughly to remove all dust.
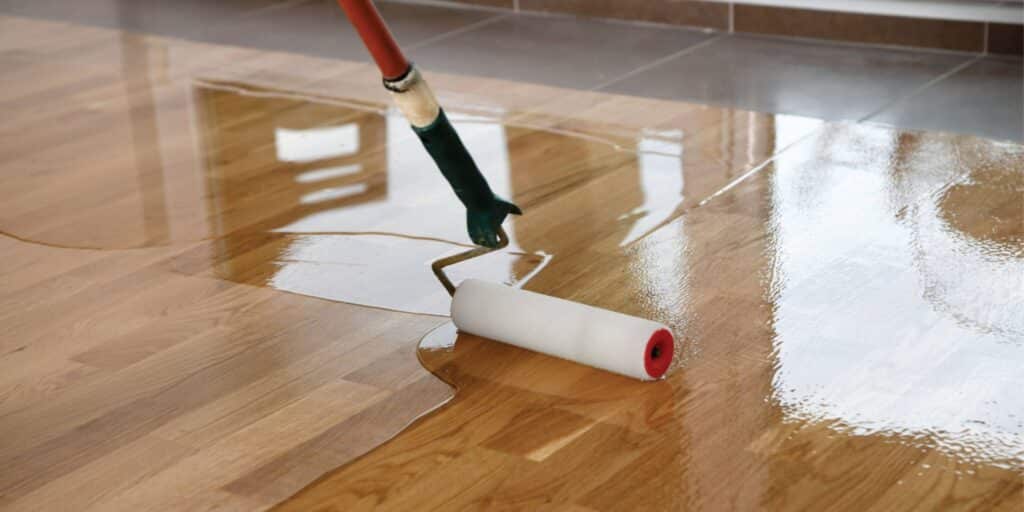
Step 4: Staining or Finishing
If you prefer to change the color of your floors, this is the time to apply a stain. Use a paintbrush or roller to apply an even coat of stain, following the manufacturer’s instructions. Allow the stain to dry completely before applying the finish.
If you’re not staining your floors, proceed directly to applying the finish. Stir the finish thoroughly before use and apply an even coat using a paintbrush or roller. Work in small sections, following the direction of the wood grain. Allow the finish to dry according to the manufacturer’s instructions.
Step 5: Apply Additional Coats
Depending on the desired level of sheen and durability, you may need to apply multiple finish coats. Allow each coat to dry completely before applying the next one. Sand lightly between coats to ensure a smooth and even finish.
Step 6: Final Touches
Once the final coat has dried, inspect the floors for any imperfections or dust particles. Lightly sand any rough spots and vacuum the floor to remove any debris. Finally, apply a final coat of finish to seal and protect your newly refinished floors.
By following these step-by-step instructions, you’ll be able to refinish your floors like a pro. Take your time, be patient, and enjoy the process of reviving your floors to their former glory.
Tips and Tricks for Achieving Professional Results
Refinishing your wood floors is a labor-intensive process, but with the right techniques, you can achieve professional-level results. Here are some tips and tricks to help you along the way:
1. Take your time: Rushing the refinishing process can result in uneven surfaces and poor finishes. Take your time to ensure each step is done properly, from sanding to applying the finish.
2. Practice on a small area: If you’re new to floor refinishing, practice on a small inconspicuous area first. This will allow you to familiarize yourself with the tools and techniques without risking damage to the entire floor.
3. Follow the wood grain: When sanding and applying finish, always work in the direction of the wood grain. This will result in a more natural and seamless appearance.
4. Use the right amount of pressure: When sanding, apply enough pressure to remove the old finish and imperfections, but not too much that you damage the wood. Similarly, when applying the finish, use a light touch to avoid streaks and drips.
5. Keep the room well-ventilated: Proper ventilation is important when working with stains and finishes. Open windows and use fans to ensure good airflow and to help with drying.
6. Use quality products: Invest in high-quality stains and finishes that are specifically designed for your type of flooring. These products will provide better durability and a more professional finish.
7. Don’t skip the prep work: Properly cleaning and preparing your floors before refinishing is crucial for achieving professional results. Take the time to remove all dirt, dust, and stains, and ensure the floors are completely dry before proceeding.
By following these tips and tricks, you’ll be well on your way to achieving stunning, professional-looking refinished floors. Remember, practice makes perfect, so don’t be discouraged if your first attempt isn’t flawless. With each refinishing project, you’ll gain more experience and confidence.
Common Mistakes to Avoid During Floor Refinishing
While refinishing your wood floors can be a rewarding DIY project, there are some common mistakes that you should avoid. By being aware of these pitfalls, you can ensure a smooth and successful refinishing process. Here are some mistakes to watch out for:
1. Insufficient sanding: Failing to sand the floors adequately can result in a poor finish and uneven surfaces. Make sure to spend enough time sanding and use progressively finer grits of sandpaper for a smooth and flawless result.
2. Skipping the test patch: Before applying stain or finish to the entire floor, always test it on a small inconspicuous area. This will allow you to see how the product interacts with your floor and ensure you’re happy with the color and finish.
3. Applying too much stain: Overapplying stain can lead to blotchy and uneven results. Follow the manufacturer’s instructions and apply the stain in thin, even coats to achieve the desired color.
4. Not allowing enough drying time: Rushing the drying process can result in smudges, streaks, and a poor finish. Be patient and allow each coat of stain or finish to dry completely before applying the next one.
5. Ignoring safety precautions: Refinishing floors involves working with chemicals, dust, and fumes. Always wear proper safety gear, ensure good ventilation, and follow the manufacturer’s guidelines for safe use of the products.
6. Using the wrong product: Using the wrong type of stain or finish for your flooring material can lead to poor adhesion and premature wear. Make sure to choose products that are specifically designed for your type of flooring.
7. Neglecting proper maintenance: Once your floors are refinished, it’s important to maintain them properly to ensure their longevity. Use appropriate cleaning products, avoid excessive moisture, and place protective pads under furniture to prevent scratches.
By avoiding these common mistakes, you can ensure a successful floor refinishing project and enjoy beautiful, long-lasting results.
Enjoy your newly refinished floors!
Of course, there will always be success stories in terms of DIYs. You can certainly pull this off if you have the resources, time, patience, and knowledge! Yet, use caution and carefully consider the risks and rewards of ReCoating your floors by yourself. An error may end up greatly costing you! Ultimately, after purchasing and renting all the needed equipment, doing proper research, and taking precious time out of your schedule, DIY-ing your floors may not be the most practical solution for your home. Instead, consider working with St Louis hardwood floor refinishing professionals who can ensure the job is done right the first time.
So, if you’re feeling intimidated by this thought and are looking for professional help, ReCoat Revolution is here to be of service! With over 20 years of experience, you can trust us to make your floors look stunning again.